Ok on this tutorial. I will show you how to create itunes account using your itunes gift card...
First Open your itunes... If you have no itunes installed on your computer....
Download Here
If you have itunes installed now. Lets proceed.. Open your itunes and then goto Itunes Store...
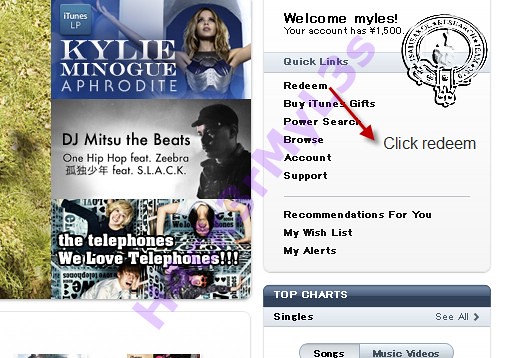
On the right pane of iTunes Store you see the word Redeem. Just simply click that...
Then after that type the code provided on your card into the box.. Then hit redeem
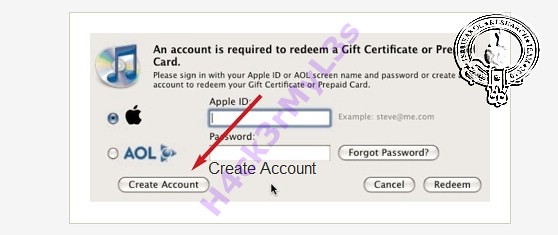
And now this time we will create itunes account.... Just type your valid email address and password then click redeem...
Click Continue
Check the box of iTunes Terms and Conditions then click Continue
Answer all questions in the box.... just follow the image....
Then.... On Credit Card Select None... Then answer again all questions...
Ok after you answered all questions its done.... FINISHED... Congratulations you have iTunes Account now...
Gadgets Hacking World
Monday, July 19, 2010
Wednesday, July 14, 2010
iPhone 3g Disable multitasking options...
Nung nag upgrade ako mejo bumagal ang iphone 3g ko...
When im done to this tricks mejo yata nagbago
First you gonna do
Donwload Diskaid
Download Here
Ok heres the procedure
Then go to your root folder
Location of the files is
Root ---- System ---- Library ----- Core Service ----- Springboard.App
Sa loob ng Springboard.App hanapin mo ang N82AP.plist
See image
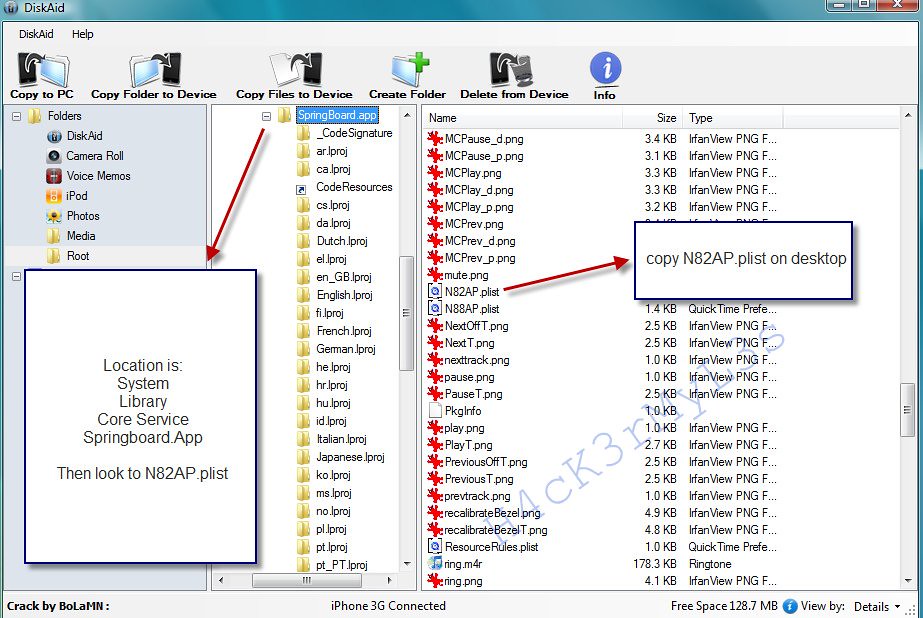
pag nakita mo sya copy to pc mo save mo lang sa desktop
Then pag na copy mo na sa pc mo yung N82AP.plist
Open with notepad mo para mas madali....
Reminder wag isara ang DISKAID
Ok heres the format of plist
capabilities
accelerometer
applicationInstallation
armv6
bluetooth
delay-sleep-for-headset-click
device-name
iPhone
gas-gauge-battery
gps
homescreen-wallpaper = False
international-settings
location-services
marketing-name
iPhone 3G
microphone
mms
multitasking = false
opengles-1
peer-peer
proximity-sensor
ringer-switch
sms
stand-alone-contacts
still-camera
telephony
telephony-maximum-generation
3
unified-ipod
volume-buttons
wifi
iconState
buttonBar
com.apple.mobilephone
com.apple.mobilemail
com.apple.mobilesafari
com.apple.mobileipod-MediaPlayer
iconLists
com.apple.MobileSMS
com.apple.mobilecal
com.apple.mobileslideshow-Photos
com.apple.mobileslideshow-Camera
com.apple.youtube
com.apple.stocks
com.apple.Maps
com.apple.weather
com.apple.mobilenotes
defaultDisplayName
Utilities
iconLists
com.apple.mobiletimer
com.apple.calculator
com.apple.VoiceMemos
com.apple.MobileStore
com.apple.AppStore
com.apple.Preferences
com.apple.MobileAddressBook
Then drag and drop again to springboard.app then restart iphone.. See what happens
When im done to this tricks mejo yata nagbago

First you gonna do
Donwload Diskaid
Download Here
Ok heres the procedure
Then go to your root folder
Location of the files is
Root ---- System ---- Library ----- Core Service ----- Springboard.App
Sa loob ng Springboard.App hanapin mo ang N82AP.plist
See image

pag nakita mo sya copy to pc mo save mo lang sa desktop
Then pag na copy mo na sa pc mo yung N82AP.plist
Open with notepad mo para mas madali....
Reminder wag isara ang DISKAID
Ok heres the format of plist
Then drag and drop again to springboard.app then restart iphone.. See what happens
Tuesday, July 13, 2010
MeGaupload Download Hacks
Here is A lil Hack To Dwnload A File Directly from MEGAUPLOAD without verifacation and with FULL SPEED.
First take a normal Link - Im Making This As An Example is All :
It will look like this
Then Let's Try and tell me.... :P
First take a normal Link - Im Making This As An Example is All :
http://www.megaupload.com/?d=56UF508PXNext Add mgr_dl.php after the / It will look like this
Http://www.megaupload.com/mgr_dl.php?d=56UF508PXNow when u do this U should go to a free screen or just a Download Now screen with the full speed of a Premium Account :DThen Let's Try and tell me.... :P
Use Free VPN on your iPhone
This tutorial let you use a free VPN on your iPhone. (Also works on your Mac/PC)
1) Register a Account on http://www.ultravpn.fr/account.htm
2) Download the Client http://www.ultravpn.fr/download.htm
3) Download OpenVpn for SBSettings
4) Copy the .ovpn File of your UltraVPN Client /config/ Folder to your iPhone: /var/mobile/Library/OpenVpn
5) Now activate OpenVPN in SBSettings (Active it before at More -> Toggles)
6) Open MobileTerminal, login as root
7) Now: cd /var/mobile/Library/OpenVpn
8) Then: openvpn-iphone --config config-name.ovpn
9) Type in your User/Password
10) Now you should be connected with the VPN. You can close the Terminal and surf with it for free.
Monday, July 12, 2010
How to install winterboard themes on DisKAid
Step 1: Download Disk Aid, which is a free file explorer for iPhone. You can check out my post on how to use Disk Aid.
Step 2: Download the Winterboard theme you love and extract the zipped file. For demonstration, I download the Super Mario Theme from Softpedia and extract in the download folder.
Step 3: Connect your iPhone to your computer via USB cable and launch DiskAid. Then select “Root folder” in the lower-left option. Answer “yes” for the warning. This option will let you browse the whole iPhone file system.

Step 4: On the left pane, go to “Library” and then access “Themes” folder. All Winterboard theme files are placed under this folder. If you have already installed some Winterboard themes on your iPhone, you’ll see those theme folders.

Step 5: Copy the themes you have download, click “Copy Folder to Device” and select the theme folder you just extracted. Click “OK” to confirm and wait for the transfer process to complete.

Step 6: The Winterboard theme is installed on your iPhone. Go back to your iPhone and launch Winterboard. Tap and select "Super Mario Sunshine" to activate your new theme. WinterBoard will mark for you. Press "Home" button and your SpringBoard will restart automatically.
Tested by me 100% pag may ask po about this pm lang po ako.
Step 2: Download the Winterboard theme you love and extract the zipped file. For demonstration, I download the Super Mario Theme from Softpedia and extract in the download folder.
Step 3: Connect your iPhone to your computer via USB cable and launch DiskAid. Then select “Root folder” in the lower-left option. Answer “yes” for the warning. This option will let you browse the whole iPhone file system.

Step 4: On the left pane, go to “Library” and then access “Themes” folder. All Winterboard theme files are placed under this folder. If you have already installed some Winterboard themes on your iPhone, you’ll see those theme folders.

Step 5: Copy the themes you have download, click “Copy Folder to Device” and select the theme folder you just extracted. Click “OK” to confirm and wait for the transfer process to complete.

Step 6: The Winterboard theme is installed on your iPhone. Go back to your iPhone and launch Winterboard. Tap and select "Super Mario Sunshine" to activate your new theme. WinterBoard will mark for you. Press "Home" button and your SpringBoard will restart automatically.
Tested by me 100% pag may ask po about this pm lang po ako.
Saturday, July 3, 2010
Downgrade iPhone iOS 4.0 to 3.1.3
Few days back Apple released iOS4 which is compatible with the iPhone 3G, iPhone 3G and iPod Touch iPod Touch 2G and 3G. Most users updated their iPhone to OS intentionally or accidentally and now finding way to downgrade back to previous iPhone firmware. If for any reason, you upgraded it to iOS 4.0 and would go back to 3.1.3, follow the steps listed below.
To downgrade the firmware on the iPod Touch and iPhone 3G, you need the ECID SHSH certificate for firmware 3.1.3, and we are sure that you had saved it before the official release of firmware 4.0.
Step 2: At the end of file add the string “74.208.10.249 gs.apple.com” useful to redirect requests for certificates for authenticity that iTunes will make to the Saurik server.
Step 3: Set up your device in recovery mode.
Step 5: Now select the original 3.1.3 firmware and wait for the completion.
Voila! you downgraded from firmware iOS 4.0 to firmware 3.1.3 and you can follow the normal guides to jailbreak firmware 3.1.3
To downgrade the firmware on the iPod Touch and iPhone 3G, you need the ECID SHSH certificate for firmware 3.1.3, and we are sure that you had saved it before the official release of firmware 4.0.
Steps to Downgrade iOS 4.0 to 3.1.3 OS Firmware
Step 1: First we make a manual change to the hosts file according to the Windows operating system. Navigate to the path “c:\windows\system32\drivers\etc\ and open the hosts file in a notepad or wordpad. MAC users can navigate to the path “/etc/” and open the hosts file with TextEdit.Step 2: At the end of file add the string “74.208.10.249 gs.apple.com” useful to redirect requests for certificates for authenticity that iTunes will make to the Saurik server.
Step 3: Set up your device in recovery mode.
- Turn off and unplug your device from your computer
- Now press and hold the Home button while reconnecting the USB cable to your iPhone. After iPhone is connected it should power on the device.
- Continue holding the Home button, you will see the iTunes logo appear and then finally a “Connect to iTunes” will be displayed, now is the time to release the Home button.
- Once the logo appeared in iTunes, you can release the Home button and make a normal recovery
Step 5: Now select the original 3.1.3 firmware and wait for the completion.
Voila! you downgraded from firmware iOS 4.0 to firmware 3.1.3 and you can follow the normal guides to jailbreak firmware 3.1.3
Monday, June 28, 2010
Modding LED's into Your PSU Molex Ends
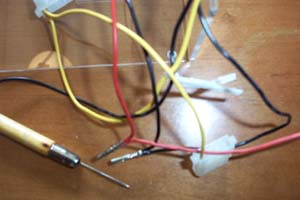
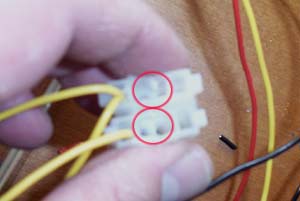
Use the needle tool (shown in the lower left of the first picture below) or other pin removal tool to remove the 5v (red) and both ground (black) pins from the molex end, there are tabs on the edge of the metal pins that you need to push in to allow its removal. Take the dremel and remove the center plastic piece (circled in red) from the molex to allow the LED to fit inside, sorry the picture is so blurry... my new camera is better.
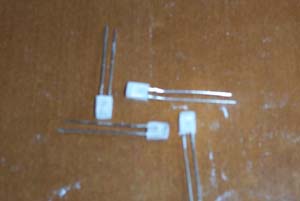
 3mm LED's would fit right into the hole you just Dremeled but at the time I couldn't find any, the only LED's I could find in 5v were 5mm so some filing was in order. Hold the LED with the hemostats and use the hobby file to square them off. Be careful not to take too much off, constantly check all sides as you go and don't go nuts by filing too hard or you can snap off the metal leads.

Solder the LED to the base of the 5v and ground pins, take care to remember which side is anode (+) and cathode (-) so that you solder it right and then after bending the tabs on the pins back outward carefully cram it all back together. I used some silicone around the molex to cover the bare LED leads. When the molex ends were all outfit with their own LED I used some chrome loom to cover all the wiring.
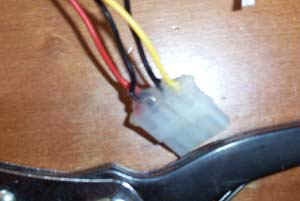
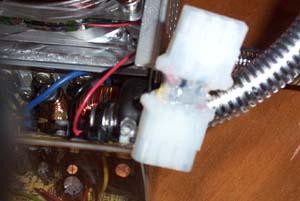




Solder the LED to the base of the 5v and ground pins, take care to remember which side is anode (+) and cathode (-) so that you solder it right and then after bending the tabs on the pins back outward carefully cram it all back together. I used some silicone around the molex to cover the bare LED leads. When the molex ends were all outfit with their own LED I used some chrome loom to cover all the wiring.


There are other ways to accomplish this mod... at least insofar as the voltage of the LED is concerned, if a 12v LED is used it can be hooked to that line (yellow wire) and a ground (black wire) or you can add a resistor to the anode side to make the LED run at 5v (red wire) which keeps everything cleanly in the middle of the molex. If you need to find the resistor value for your LED there are many LED calculators on the 'net.


I did this mod to my test PSU and it does look sweet, if I were to do it for my own case I would only put LED's into the molex ends that hooked into my drives since they are the only ones that would show through the side window. This mod is cheap and easy, if you cannot hide ugly plug ends then you may as well turn them into something worth seeing... sounds like some of the women I've known, LOL.
Credits: To ArtTROY
Happy Modding
Wednesday, June 23, 2010
Left 4 Dead Online and Offline game Tutorial

[GA101]
Garena - http://www.garena.com/
Left 4 dead Major Patch - http://www.mediafire.com/?jnzoghymkjg
Left 4 dead standalone patch - http://www.mediafire.com/?gz2cmmdztm2
Index (Ctrl+F and find the code to reach your destination)
[GA101] - Guide
[GA201] - Garena Settings: Set up Garena for Left 4 Dead.
[GA309] - Enable Console: Enabling developer console in Left 4 Dead for other usage.
[GA407] - Joining Game: Join games in Left 4 Dead when playing on Garena.
[GA418] = via Console: Using console to join games.
[GA429] = via Lobby: Using server list to join games.
[GA503] - Hosting Game: Hosting game and let your friends play.
[GA515] = via Console: Using console to host games.
[GA527] = via Lobby: Using lobby to host games.
[GA602] - Useful Hosting CVARs: Configuring your server.
[PA104] - Patch
[PA308] - Notice: Something about the patch.
[PA203] - Standalone Patch w/ Game update: Left 4 Dead updates and patch.
Garena Settings [GA201]
1. On Garena, find and click Settings which located at top of Garena.
| Click this bar to view the full image. |
2. Once the Game Settings appear, find and click Left 4 Dead in LAN Games list on the left.
3. In Executable Settings, browse to your left4dead.exe, eg: C:\Program Files\Left 4 Dead\left4dead.exe
4. In Game Bootstrap Parameters, fill in +sv_allow_lobby_connect_only 0 +sv_lan 1.
| Click this bar to view the full image. |

5. Click OK button and you are done.
6. To start Left 4 Dead via Garena, click the Start Game button.
| Click this bar to view the full image. |

Enable Console [GA309]
1. Start Left 4 Dead.
2. Once on the Menu, click OPTIONS.
3. An extended menu will appear at the right, click Keyboard/Mouse.
| Click this bar to view the full image. |
4. Find and click ALLOW DEVELOPER CONSOLE.
5. Another extended menu will appear right side, click Enabled.
| Click this bar to view the full image. |
6. Your developer console is now enabled.
Joining Game [GA407]
via Console. [GA418]
1. Find IP address, click on the user whom host room to find their Garena IP or find at the chat, eg: 192.168.29.xx
| Click this bar to view the full image. |

2. Start your Left 4 Dead.
3. Once on the Menu, press tilde "~" (Beside 1 above Tab) key on your keyboard to call the console.
4. Type in connect[space][IP address] and wait until the game load.
| Click this bar to view the full image. |
via Lobby. [GA429]
1. Start Left 4 Dead.
2. Click on Friends Playing that shown at near bottom left.
| Click this bar to view the full image. |

3. Choose a server.
4. Double click the server or click Join Game to join in.
| Click this bar to view the full image. |

Hosting Game [GA503]
via Console. [GA515]
1. Start your Left 4 Dead.
2. Type in map[space][map name] (Map list will appear after spacing) in console and press Enter, eg
 Co-op) map l4d_hospital01_apartment|(VS)map l4d_vs_hospital01_aprtment
| Click this bar to view the full image. |
3. Type z_difficulty[space][easy,normal,hard,impossible] in console to change difficulty.
| Click this bar to view the full image. |
4. Call the console, type net_status to find your Garena IP, eg: 192.168.29.73. Ports also can be found.
| Click this bar to view the full image. |
5. Switch to Garena and tell others your Garena IP address.
via Lobby. [GA527]
1. Start Left 4 Dead.
2. Once reached the Menu Screen, click PLAY CAMPAIGN.
3. The menu will extend to the right, click Play With Friends.
4. The Lobby will appear, click CREATE LOBBY.
5. The menu will extend to the right, click Campaign Mode (Co-op) or Versus Mode (VS).
6. Game Settings will be shown, the Permission set Friends Playing and Server Type set Local Server.
7. You will reach the Lobby, set up your desired settings for your game and wait for some players. (OPTIONAL)
8. Click START THE GAME to start your game.
9. The game will start loading and create your server.
Credits to: EXAGLADE
Subscribe to:
Comments (Atom)
