Home

Thursday, April 29, 2010

HowTo: Manually BackUp Your iPhone

How to save Contacts Database:

  • SSH into the iPhone and go to /private/var/mobile/Library/AddressBook
  • you will find 2 files there. save them on your computer.
How to save Messages Database:
  • SSH to your phone and go to /private/var/mobile/Library/SMS
  • Save sms.db on your computer
How to backup Calendar:
  • SSH into your device and go to /private/var/mobile/Library/Calendar
  • Copy Calendar.sqlitedb to your computer
How to backup Notes:
  • SSH into your dedvice and go to /private/var/mobile/Library/Notes
  • Copy notes.db and notes.idx to your computer
How To back up Photos:
This doesent necesarelly require any SSH. You can just connect your iPhone to the computer and copy your photos:

Mac
  • connect iPhone
  • open iPhoto and copy your photos
  • or use iPhoneExplorer. Read about it here
Windows
  • connect iPhone
  • open MyComputer
  • you will see the iPhone as a new device ( a photo camera ) . Open it and save your photos
IF you prefer SSH , this is what you need to do:
  • SSH into your iPhone
  • go to /var/mobile/Media/DCIM/
NOTE:
For videos shot with iPhone 3Gs, you need the same path ( correct me if i am wrong )
How to backup Mail:
Email itself doesnt need any backup. Your iPhone or your computer is not the server for your email accounts, so you dont need to worry about loosing your emails accounts. However, you might want to save your email account as you set them up on your iPhone, so you wont need to go to all that process once again.
  • SSH into your device
  • go to /private/var/mobile/library/ and just copy the folder called “Mail” to your computer
How to backup Visual Voicemail:
  • SSH into your device
  • go to var/mobile/Library/Voicemail/voicemail.db
  • Individual voicemails are stored as 1.amr, 2.amr, etc. in the same folder. If you’ve recorded a custom greeting, it’s stored as Greeting.amr.
How to backup videos from 3rd party apps:
Cycorder
  • SSH into your device
  • go to /private/var/mobile/media/videos
iPhone Video Recorder for 3G:
  • SSH into your device
  • go to /private/var/mobile/media/iphonevideorecorder/
How to backup files downloaded with Safari DL Plug-In
  • SSH into your device
  • go to /var/mobile/Library/Downloads
How to backup your Call History:
  • SSH into your iPhone
  • go to /var/mobile/Library/CallHistory/
  • copy call_history.db to your computer
Credits to Lil mac

    Tuesday, April 27, 2010

    Thunderst0rm Tested As Not Working See Details Inside

    Ok Mga kapatid. Lumabas na ang thunderstorm at na download ko na. Sa atat na ma ishare ko sa inyo. Sinubukan ko muna on my iphone kung working or not.

    Unit tested: iPhone 3gs 32gb 3.1.3 Version baseband 05.12 OTB


    RESULT: Nothing happen sa iPhone

    TESTED OS USE:

    Windows Vista Ultimate 64 Bit
    Windows Vista Home Premium 32 Bit
    Windows XP Service Pack 3 32 Bit

    Saturday, April 24, 2010

    Download iPhone Custom Firmware 3.1.3 (IPSW Files)

    Download iPhone Custom Firmware 3.1.3 (IPSW Files)

    iPhone 3GS Custom Firmware 3.1.3 IPSW

    Activated (for UnOfficial Carrier Users)
    RAPIDSHARE
    iPhone2_1_3.1.3_7E18_Custom_Restore_Activated.zip.001
    iPhone2_1_3.1.3_7E18_Custom_Restore_Activated.zip.002
    iPhone2_1_3.1.3_7E18_Custom_Restore_Activated.zip.003
    iPhone2_1_3.1.3_7E18_Custom_Restore_Activated.zip.004
    MEGAUPLOAD
    NOT Activated (for Official Carrier Users)
    RAPIDSHARE
    iPhone2_1_3.1.3_7E18_Custom_Restore_NOT_Activated.zip.001
    iPhone2_1_3.1.3_7E18_Custom_Restore_NOT_Activated.zip.002
    iPhone2_1_3.1.3_7E18_Custom_Restore_NOT_Activated.zip.003
    iPhone2_1_3.1.3_7E18_Custom_Restore_NOT_Activated.zip.004
    MEGAUPLOAD

    iPhone 3G Custom Firmware 3.1.3 IPSW

    Activated (for UnOfficial Carrier Users)
    RAPIDSHARE
    iPhone1_2_3.1.3_7E18_Custom_Restore_Activated.zip.001
    iPhone1_2_3.1.3_7E18_Custom_Restore_Activated.zip.002
    iPhone1_2_3.1.3_7E18_Custom_Restore_Activated.zip.003
    MEGAUPLOAD
    NOT Activated (for Official Carrier Users)
    RAPIDSHARE
    iPhone1_2_3.1.3_7E18_Custom_Restore_NOT_Activated.zip.001
    iPhone1_2_3.1.3_7E18_Custom_Restore_NOT_Activated.zip.002
    iPhone1_2_3.1.3_7E18_Custom_Restore_NOT_Activated.zip.003

    iPhone 2G Custom Firmware 3.1.3 IPSW

    Activated (for UnOfficial Carrier Users)
    RAPIDSHARE
    iPhone1_1_3.1.3_7E18_Custom_Restore_Activated.zip.001
    iPhone1_1_3.1.3_7E18_Custom_Restore_Activated.zip.002
    iPhone1_1_3.1.3_7E18_Custom_Restore_Activated.zip.003
    MEGAUPLOAD

    iPhone 3.1.3 to 3.1.2 with Custom Firmware 3.1.2 Fix Apple Boot Logo and Crashes

    iPhone 3.1.3 to 3.1.2 with Custom Firmware 3.1.2 Fix Apple Boot Logo and Crashes

    Hello,


    TO MAKE SURE IF THIS METHOD WORKED FOR YOU, FOR IT TO WORK IN THE FUTURE UNTIL OFFICAL JAILBREAK AND UNLOCK COME OUT, DO NOT UPDATE ITUNES AS THEY MIGHT BLOCK THIS METHOD!!! DONT SAY I DIDNT TRY TO HELP YOU!


    For those that install bosspref over cydia and get apple logo, rather than restoring your iphone and losing time, delete bosspref manually.

    INSTRUCTIONS BELOW ! LOOK FOR THE NEWEST UPDATE !

    WHEN YOU FIX THAT IPHONE INSTALL SBSETTING RATHER THAN BOSSPREF, simply it's better
    !


    BEFORE I BEGIN. THIS IS TESTED ON VISTA NOT XP!, IPHONE 3GS, FIRMWARE 3.1.2 BASEBAND 5.11.07,OLD BOOT !!!! AND CUSTOM FIRMWARE 3.1.3 WITH 5.11.07 baseband NOTHING ELSE! Like i said only tested on those stated ! NOW THAT DONT MEAN IT WONT WORK ON 3G, AM SURE IT WILL.

    I DONT HAVE MY 3.1.2 SHSH ON SAURIKS SERVER ONLY 3.1.3.

    THIS IS TESTED BY ME AND THIRD PERSON AND IT WORKED PERFECTLY RESTORING BACK TO 3.1.2

    ALSO I WANTED TO MENTION I EDITED MY HOSTS IN WINDOWS, SYSTEM 32, DRIVERS, ETC, HOSTS WITH
    74.208.10.249 gs.apple.com


    I take no credit for making custom firmware or posting it, credits to respective people who did make them.

    I take credit only for making instructions thats all.

    Newest Update:

    If you installed some program through cydia and you rebooted your iphone and got stuck on apple logo, YOU CAN STILL SSH INTO YOUR IPHONE and maybe fix your IPHONE, by removing that program's files inside your iphone!

    Remember what program you have installed

    Go to iFun-Box NAVIGATE THROUGH RAW FILE SYSTEM

    ROOT/LIBRARY/MOBILE SUBSTRATE/DYNAMIC SUBSTRATE

    YOU WILL SEE TWO FILES LIYB AND PLIST, DELETE BOTH OF THEM!


    OR SSH into your iphone and navigate to

    ROOT/LIBRARY/MOBILESUBSTRATE/DYNAMIC SUMSTRATE AND THE PROGRAM SHOULD IN THE FOLDER.

    THERE SHOULD BE TWO FILES OF THAT PROGRAM, LIYB AND PLIST.

    DELETE BOTH FILES YOUR IPHONE SHOULD REBOOT AND BOOT UP.

    ANOTHER WAY WOULD BE

    Back up your com.Springboard.plist when your iphone is fully functional.


    I tried helping few people today with their iphone being stuck in Apple Boot LOGO, if the only way out of that is to restore I CAN HELP.


    IF FOLDERS ARENT THERE DONT WORRY ABOUT IT. THEY MIGHT NOT BE THERE BECAUSE YOU NEVER UPDATED YOUR IPHONE USING ITUNES, BECAUSE FIRMWARES ARE ALL OVER THE INTERNET.


    PLEASE IN THE LAST STEP DO NOT DELETE FOLDERS IPHONE SOFTWARE UPDATE AND DEVICE SUPPORT ONLY WHAT'S INSIDE THOSE TWO FOLDERS !


    Before you Begin FOR VISTA USERS
    Go to Start Right Click and go to Explore Find This Folder ROAMING

    Click this bar to view the full image.
    Click the image to open in
 full size.


    After you have done that find folder named Apple Computer

    This image has been resized. Click this bar to view the full image. The original image is sized 794x256.
    Click the image to open in 
full size.


    After you have found apple computer go to folder iTunes

    This image has been resized. Click this bar to view the full image. The original image is sized 545x272.
    Click the image to open in
 full size.


    After you find that,go to Folders Selected IN THE PICTURE. From those two folders Delete Everything inside the folders! NOT ACTUAL FOLDERS
    This image has been resized. Click this bar to view the full image. The original image is sized 604x272.
    Click the image to open in
 full size.


    Don't ask me how to DFU or how to get out of DFU MODE

    OR how to put iphone into RECOVERY mode.

    Am sure as iphone owner you should be able to do that by now. If this is your first time, PLEASE USE MODMYI other FORUMS to find out how to do those.

    First of you need Custom Firmware 3.1.2

    Google just as written
    Custom 3.1.2 Firmware For iPhone 2G/3G/3GS
    OR PM ME IF YOU CANT FIND IT ON GOOGLE


    Second you can use iTunes Latest Version !

    Third PUT your iphone into recovery mode NOT DFU MODE !

    Fourth Open itunes and it'll tell you your in recovery mode you need to restore.

    Hold SHIFT and Click Restore navigate to your Custom Firmware folder or wherever you have placed it in and let it restore

    Friday, April 23, 2010

    How to remove keyboard, replace memory and access hard drive in HP 2133 Mini-Note PC


    In this guide I explain how to remove keyboard, replace memory module and access hard drive in a HP 2133 Mini-Note PC. Fortunately all these three components can be removed without taking the whole thing apart. Even a novice user can do that if he/she is careful enough.
    Also, you should be able this guide for taking apart a HP 2140 Mini-Note PC which has the same body.
    Before you start do not forget to turn off the laptop and remove the main battery.


    STEP 1.
    REMOVING THE KEYBOARD.

    In the battery compartment you’ll find three screws securing the keyboard to the laptop base. Remove these three screws.

    Carefully lift up the top side of the keyboard as it shown on the picture below. There are small plastic latches securing the keyboard on both side but they should’t be a problem. Do not lift up the keyboard too much, it’s still connected to the motherboard.

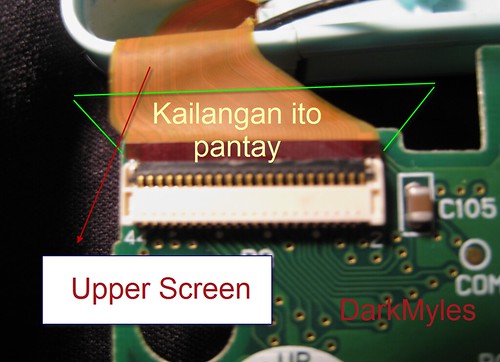
    Set the keyboard so you can access the cable connector underneath. You’ll have to unlock the connector before you can release the cable and remove the keyboard.
    WARNING! Be very careful with the connector. You cannot replace the connector if you accidentally break it. The connector is permanently attached to the motherboard. If it’s broken, the whole motherboard has to be replaced.

    In order to unlock the connector, lift up the brown locking clip. The clip will open as a door on hinges.

    On the picture below you see the same connector in the unlocked state.

    Now you can release the cable and remove the keyboard.

    Here’s the back side of the keyboard removed from a HP 2133 Mini-Note PC.
    You can find a new replacement keyboard if you search by the part number 482280-001. The keyboard is not expensive and can be purchased for less than $25. Searches by the keyboard model number 468509-001 also will bring you some results.

    STEP 2.
    REMOVING THE MEMORY MODULE.

    HP 2133 Mini-Note PC has only one memory slot and it’s located under the keyboard. After the keyboard is removed, you’ll find the memory module between the cooling fan and hard drive.
    In order to remove the memory module, carefully spread latches on both sides of the slot.

    The memory module will pop up at a 20-30 degree angle and you can pull it from the slot by the edges.
    HP 2133 Mini-Note PC will take up to 2GB memory module. You should use DDR2 PC2-5300 or faster DDR2 SODIMM module.

    STEP 3.
    REMOVING THE HARD DRIVE.

    Remove two screws (green) and loosen one screw (yellow) securing the hard drive assembly.

    Pull the hard drive cable up and disconnect it from the motherboard.

    Remove the hard drive assembly from the laptop.

    Remove two screws from each side of the hard drive assembly. These screws securing the hard drive to the caddy.

    Remove the hard drive from the caddy.

    Disconnect the hard drive connector.

    Now you can replace the hard drive with a new one. In my laptop I had a 120GB 7200RPM hard drive installed. You can replace it with a larger drive without any problem. Make sure then new drive also works at 7200RPMs. You can find a brand new 320GB 7200RPM hard drive here for less than &70.
    CLEANING THE COOLING FAN.
    If your laptop overheats, most likely it happens because the cooling module got clogged with dust.
    When you remove the keyboard you can get a limited access to the cooling fan. It would be enough for cleaning the fan and heat sink.
    For cleaning the fan use a can of compressed air of find an air compressor. Spray compressed air into the fan until all dust is gone.
    Block the fan with your finger so it doesn’t spin when you spray air inside the cooling module. Hi RPMs can kill the fan bearing.

    You’ll find complete laptop disassembly instructions in the official service manual for HP 2133 Mini-Note PC and HP 2140 Mini-Note PC.

    Credits to inside My laptop

    Thursday, April 22, 2010

    iPhone Stuck on Apple Logo After Installing an App from Cydia

    Some times after installing an App from Cydia when you respring/reboot the device it stuck at the apple logo, iTunes will recognize that “an” iPhone is connected to it, but it wont identify the iPhone as being your iPhone. Every time you turn it on it goes back to the apple logo. Here is the little fix hat will help you to fix this problem. First of all download and install iPhoneBrowser. When you run iPhoneBrowser, the software might say that no iPhone is found. If that is the case, than disconnect and reconnect your device and iPhoneBrowser will recognize it. Once iPhone browser recognizes your phone follow the following steps and you’ll be fine.
    iPhone Stucked on Apple Logo
    • Navigate to /System/Library/LaunchDaemons/com.apple.SpringBoard.plist and backup com.apple.Springboard.plist to your PC.
    • Download and install EditPadLite from EditPad Lite – Free Text Editor for Windows . Than rename com.apple.Springboard.plist tocom.apple.Springboard.plist.txt
    • After changing the file extension form .plist to .txt, open it wit EditPadLite ( Wordpad or Notpad wont work ) and edit the file by removing the the offending key in the DYLD_INSERT_LIBRARIES


    Tuesday, April 20, 2010

    Asus EeePC 900 Fido Touch Panel Setup


    http://01f5916.netsolhost.com/eeemod/eee900/IMG1.jpg
    http://01f5916.netsolhost.com/eeemod/eee900/IMG2.jpg
    http://01f5916.netsolhost.com/eeemod/eee900/IMG3.jpg
    http://01f5916.netsolhost.com/eeemod/eee900/IMG4.jpg
    http://01f5916.netsolhost.com/eeemod/eee900/IMG5.jpg
    http://01f5916.netsolhost.com/eeemod/eee900/IMG6.jpg
    http://01f5916.netsolhost.com/eeemod/eee900/IMG7.jpg
    http://01f5916.netsolhost.com/eeemod/eee900/IMG8.jpg
    http://01f5916.netsolhost.com/eeemod/eee900/IMG9.jpg
    http://01f5916.netsolhost.com/eeemod/eee900/IMG10.jpg
    http://01f5916.netsolhost.com/eeemod/eee900/IMG11.jpg
    http://01f5916.netsolhost.com/eeemod/eee900/IMG_0151.JPG
    http://01f5916.netsolhost.com/eeemod/eee900/IMG12.jpg
    http://01f5916.netsolhost.com/eeemod/eee900/IMG13.jpg
    http://01f5916.netsolhost.com/eeemod/eee900/IMG14.jpg
    http://01f5916.netsolhost.com/eeemod/eee900/IMG15.jpg


    Credits to: Anthony Wrecker

    Saturday, April 17, 2010

    Nintendo Ds Lite With iPod Skins Tested.


     Watch Here

     http://www.youtube.com/watch?v=a-2va2oSdWA

     Image here

    Download and Install Instructions

    • Download DarkMyles ipod skin
    • Create a folder called 'lmp-ng' in the root of your card
    • Copy the 'skins' folder from the zip file into the 'lmp-ng' folder you created above.
    • Extract lmp-ng-2-alpha.nds to your apps folder
    • Run LMP-ng from the apps menu of your card 
     

      Sunday, April 4, 2010

      Nintendo Ds Lite Pinout for Modders

      Nintendo Ds Lite pinout for modders.

      Changing stand by and charging led


      GBA slot for backlight


      Upper Screen Flex with Speaker pinouts


      Mostly jumper pinout for wet unit


      F2 Fuse


      Solution for turn on with lower flash screen